
-1.png)
最終更新日 2025年7月22日
-1-1024x576.png)
この記事はこんな人におすすめ!
「error: Could not get shadow information for user」というエラーが出て、SSH接続できない
PAMとはどういうものなのか確認したい
/etc/ssh/sshd_configファイルについて教えてほしい
記事の概要
仮想マシンAから仮想マシンBにパスワード認証を使用して接続しようとしたのですが、
なぜか、設定したパスワードを入力しても接続できず、↓のようなエラーが表示されました。
error: Could not get shadow information for userこの際、どのように対処すればいいかを記載します。
PAMはエンジニアとしては必ず押さえてほいたほうがいいと思うので、
ぜひこちらの記事で確認してみてください。
SSH接続エラーの詳細
SSHで接続を開始した側の仮想マシンで表示されるエラー
SSH接続を開始した側の仮想マシンでは、正しいバスワードを入力しているのにもかかわらず
↓のようなエラーが表示されてしまいます。
Permission denied (publickey,gssapi-keyex,gssapi-with-mic,password).user@debianvm:~$ ssh centosvm.goritarou.com
user@centosvm.goritarou.com's password:
Permission denied, please try again.
user@centosvm.goritarou.com's password:
Permission denied, please try again.
user@centosvm.goritarou.com's password:
user@centosvm.goritarou.com: Permission denied (publickey,gssapi-keyex,gssapi-with-mic,password).
user@debianvm:~$SSHで接続される側の仮想マシンでエラーログを確認
私は、セキュリティー関係のエラーが出力された際は、必ず、/var/log/secure ファイルのログを
確認するようにしています。
話がそれますが、/var/log/secure ファイルのログを確認すると、セキュリティー関係のエラーが原因を
知ることが出来るので、必ず見るようにするといいと思います。
SSHで接続される側の仮想マシンで、/var/log/secure ファイルのログを確認したところ、
下記のログが出力されていました。
error: Could not get shadow information for user/etc/shadow ファイルで user の情報が見つけられないからエラーになっていると表示されています。
[root@centosvm .ssh]# cat /var/log/secureAug 12 16:53:09 centosvm sshd[5866]:
Connection closed by 192.168.74.130 port 59292 [preauth]
Aug 12 16:53:26 centosvm sshd[5895]: error: Could not get shadow information for user
Aug 12 16:53:26 centosvm sshd[5895]: Failed password for user from 192.168.74.130 port 38576 ssh2
Aug 12 16:53:31 centosvm sshd[5895]: Failed password for user from 192.168.74.130 port 38576 ssh2
Aug 12 16:53:35 centosvm sshd[5895]: Failed password for user from 192.168.74.130 port 38576 ssh2
Aug 12 16:53:35 centosvm sshd[5895]: Connection closed by 192.168.74.130 port 38576 [preauth]
Aug 12 17:02:12 centosvm sshd[6550]: error: Could not get shadow information for user
Aug 12 17:02:12 centosvm sshd[6550]: Failed password for user from 192.168.74.130 port 45714 ssh2
Aug 12 17:02:25 centosvm sshd[6550]: Failed password for user from 192.168.74.130 port 45714 ssh2
Aug 12 17:02:29 centosvm sshd[6550]: Failed password for user from 192.168.74.130 port 45714 ssh2
Aug 12 17:02:29 centosvm sshd[6550]: Connection closed by 192.168.74.130 port 45714 [preauth]
念のため、/etc/shadow ファイルを確認してみましたが、ログイン使用しているユーザー(user)の情報は
正しく記載されていました。
/etc/shadow のファイルの内容(下のほうにユーザー(user)の情報が確認できます)
[root@centosvm .ssh]# cat /etc/shadow
root:$1$U5$QV9Dt.XfDcMSHITkKQvDo1::0:99999:7:::
bin:*:18353:0:99999:7:::
daemon:*:18353:0:99999:7:::
adm:*:18353:0:99999:7:::
lp:*:18353:0:99999:7:::
sync:*:18353:0:99999:7:::
shutdown:*:18353:0:99999:7:::
halt:*:18353:0:99999:7:::
mail:*:18353:0:99999:7:::
operator:*:18353:0:99999:7:::
games:*:18353:0:99999:7:::
ftp:*:18353:0:99999:7:::
nobody:*:18353:0:99999:7:::
systemd-network:!!:19197::::::
dbus:!!:19197::::::
polkitd:!!:19197::::::
libstoragemgmt:!!:19197::::::
colord:!!:19197::::::
rpc:!!:19197:0:99999:7:::
saned:!!:19197::::::
gluster:!!:19197::::::
saslauth:!!:19197::::::
abrt:!!:19197::::::
setroubleshoot:!!:19197::::::
rtkit:!!:19197::::::
pulse:!!:19197::::::
radvd:!!:19197::::::
chrony:!!:19197::::::
unbound:!!:19197::::::
qemu:!!:19197::::::
tss:!!:19197::::::
sssd:!!:19197::::::
usbmuxd:!!:19197::::::
geoclue:!!:19197::::::
ntp:!!:19197::::::
gdm:!!:19197::::::
rpcuser:!!:19197::::::
nfsnobody:!!:19197::::::
gnome-initial-setup:!!:19197::::::
sshd:!!:19197::::::
avahi:!!:19197::::::
postfix:!!:19197::::::
tcpdump:!!:19197::::::
user:$1$22tfpnMZ$.1NB5cuSUsE3aZsVxgt2F/:19216:0:99999:7:::
apache:!!:19203::::::
test:$1$jYhoCyS0$o94RKJiyQDhy8pktgUhwu1:19212:0:99999:7:::
[root@centosvm .ssh]#
今回表示されたエラー
- Permission denied (publickey,gssapi-keyex,gssapi-with-mic,password).
- error: Could not get shadow information for user
対処方法
対処方法は/etc/ssh/sshd_config ファイルを修正すること
/etc/ssh/sshd_config ファイルの「PAM」という項目があるのですが、こちらの項目が「no」になっていると
うまくSSH接続ができないようです。
そのため、/etc/ssh/sshd_config ファイルの「PAM」という項目を「yes」に変更する必要があります。
/etc/ssh/sshd_config ファイルの「PAM」の項目を確認してみると、確かに「PAM」の項目が
「no」になっていました。
[root@centosvm .ssh]# cat /etc/ssh/sshd_config | grep PAM
# Set this to 'yes' to enable PAM authentication, account processing,
# and session processing. If this is enabled, PAM authentication will
# PasswordAuthentication.  Depending on your PAM configuration,
# PAM authentication via ChallengeResponseAuthentication may bypass
# If you just want the PAM account and session checks to run without
# PAM authentication, then enable this but set PasswordAuthentication
# WARNING: 'UsePAM no' is not supported in Red Hat Enterprise Linux and may cause several
UsePAM no
[root@centosvm .ssh]#
/etc/ssh/sshd_config ファイルの修正手順
viコマンドを使用して、/etc/ssh/sshd_config ファイルの内容を↓のように修正します。
修正前:UsePAM no
修正後:UsePAM yes
※接続する側の仮想マシンと、接続される側の仮想マシンの両方で上記の修正を行う必要があります。
vi /etc/ssh/sshd_config修正した後の/etc/ssh/sshd_config ファイルの中身は↓のような感じです。
[root@centosvm .ssh]# cat /etc/ssh/sshd_config
# $OpenBSD: sshd_config,v 1.100 2016/08/15 12:32:04 naddy Exp $

# This is the sshd server system-wide configuration file.  See
# sshd_config(5) for more information.

# This sshd was compiled with PATH=/usr/local/bin:/usr/bin

# The strategy used for options in the default sshd_config shipped with
# OpenSSH is to specify options with their default value where
# possible, but leave them commented.  Uncommented options override the
# default value.

# If you want to change the port on a SELinux system, you have to tell
# SELinux about this change.
# semanage port -a -t ssh_port_t -p tcp #PORTNUMBER
#
#Port 22
#AddressFamily any
#ListenAddress 0.0.0.0
#ListenAddress ::

HostKey /etc/ssh/ssh_host_rsa_key
HostKey /etc/ssh/ssh_host_dsa_key
HostKey /etc/ssh/ssh_host_ecdsa_key
HostKey /etc/ssh/ssh_host_ed25519_key

# Ciphers and keying
#RekeyLimit default none

# Logging
#SyslogFacility AUTH
SyslogFacility AUTHPRIV
#LogLevel INFO

# Authentication:

#LoginGraceTime 2m
PermitRootLogin yes
#StrictModes yes
#MaxAuthTries 6
#MaxSessions 10

PubkeyAuthentication yes

# The default is to check both .ssh/authorized_keys and .ssh/authorized_keys2
# but this is overridden so installations will only check .ssh/authorized_keys
AuthorizedKeysFile .ssh/authorized_keys

#AuthorizedPrincipalsFile none

#AuthorizedKeysCommand none
#AuthorizedKeysCommandUser nobody

# For this to work you will also need host keys in /etc/ssh/ssh_known_hosts
#HostbasedAuthentication no
# Change to yes if you don't trust ~/.ssh/known_hosts for
# HostbasedAuthentication
#IgnoreUserKnownHosts no
# Don't read the user's ~/.rhosts and ~/.shosts files
#IgnoreRhosts yes

# To disable tunneled clear text passwords, change to no here!
PasswordAuthentication yes
#PermitEmptyPasswords no
#PasswordAuthentication no

# Change to no to disable s/key passwords
#ChallengeResponseAuthentication yes
ChallengeResponseAuthentication no

# Kerberos options
#KerberosAuthentication no
#KerberosOrLocalPasswd yes
#KerberosTicketCleanup yes
#KerberosGetAFSToken no
#KerberosUseKuserok yes

# GSSAPI options
GSSAPIAuthentication yes
GSSAPICleanupCredentials no
#GSSAPIStrictAcceptorCheck yes
#GSSAPIKeyExchange no
#GSSAPIEnablek5users no

# Set this to 'yes' to enable PAM authentication, account processing,
# and session processing. If this is enabled, PAM authentication will
# be allowed through the ChallengeResponseAuthentication and
# PasswordAuthentication.  Depending on your PAM configuration,
# PAM authentication via ChallengeResponseAuthentication may bypass
# the setting of "PermitRootLogin without-password".
# If you just want the PAM account and session checks to run without
# PAM authentication, then enable this but set PasswordAuthentication
# and ChallengeResponseAuthentication to 'no'.
# WARNING: 'UsePAM no' is not supported in Red Hat Enterprise Linux and may cause several
# problems.
UsePAM yes

#AllowAgentForwarding yes
#AllowTcpForwarding yes
#GatewayPorts no
X11Forwarding yes
#X11DisplayOffset 10
#X11UseLocalhost yes
#PermitTTY yes
#PrintMotd yes
#PrintLastLog yes
#TCPKeepAlive yes
#UseLogin no
#UsePrivilegeSeparation sandbox
#PermitUserEnvironment no
#Compression delayed
#ClientAliveInterval 0
#ClientAliveCountMax 3
#ShowPatchLevel no
#UseDNS yes
#PidFile /var/run/sshd.pid
#MaxStartups 10:30:100
#PermitTunnel no
#ChrootDirectory none
#VersionAddendum none

# no default banner path
#Banner none

# Accept locale-related environment variables
AcceptEnv LANG LC_CTYPE LC_NUMERIC LC_TIME LC_COLLATE LC_MONETARY LC_MESSAGES
AcceptEnv LC_PAPER LC_NAME LC_ADDRESS LC_TELEPHONE LC_MEASUREMENT
AcceptEnv LC_IDENTIFICATION LC_ALL LANGUAGE
AcceptEnv XMODIFIERS

# override default of no subsystems
Subsystem sftp /usr/libexec/openssh/sftp-server

# Example of overriding settings on a per-user basis
#Match User anoncvs
# X11Forwarding no
# AllowTcpForwarding no
# PermitTTY no
# ForceCommand cvs server
[root@centosvm .ssh]#sshdサービスを再起動
/etc/ssh/sshd_config ファイルの内容を編集したので、両方の仮想マシンのsshdサービスを再起動する必要があります。
再起動のコマンドは以下です。
systemctl restart sshd.service以上で問題なくSSH接続が出来るようになっているはずです。
念のためSSH接続がパスワード認証で出来るようになっているかどうか確認します。
user@debianvm:~$ ssh user@centosvm.goritarou.com
user@centosvm.goritarou.com's password:
Last login: Fri Aug 12 17:25:03 2022 from debianvm.goritarou.com
[user@centosvm ~]
上記で問題なくパスワード認証でSSH接続が出来るようになっていることが確認できました。
1./etc/ssh/sshd_config ファイルのPAMの項目を「UsePAM yes」に修正
2.仮想マシンのsshdサービスを再起動
PAMとは
最後に今回修正したPAMとはどのようなものなのかご紹介いたします。
PAMの概要
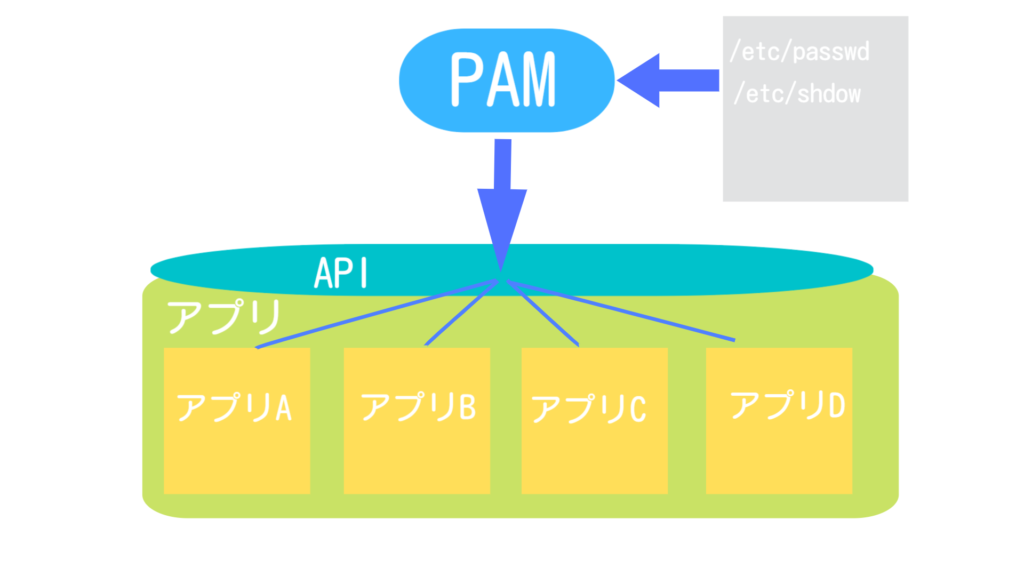
PAMとは、ユーザー認証に使用されるシステムのことです。
UNIX系のシステムで広く使用されている認証システムです。
PAMはLinuxの認証だけではなく、アプリケーションの認証でも利用することが出来ます。
例えば、telnet,sshなどのアプリケーションにおいても、PAMを使用した認証をすることが出来ます。
デフォルトの場合、PAMは、/etc/passwd、/etc/shdow ファイルの情報をもとに認証を行います。
今回SSH接続が出来なくなり、/etc/shdow ファイルで情報が見つからないとエラーが表示されていたのは、
このことが原因だと思われます。
PAMを使用することによって、Linuxだけでなく、アプリケーションでも認証をすることが出来、
認証方式を統一することが出来ます。


ゴリタン
インフラエンジニアとして、ネットワークとサーバーの運用・保守・構築・設計に幅広く携わり、
現在は大規模政府公共データの移行プロジェクトを担当。
CCNPやLPICレベル3、AWSセキュリティスペシャリストなどの資格を保有しています。